Note: this article is reprinted in its entirety with permission from the blog of the nice folks at Hole Pro. We get a lot of customers with questions in regards to cutting the holes for recessed lighting. Often, mistakes are made-some of which are very difficult to correct for. We think you will find their article very helpful. Be sure to visit their web site for more of their product information. Although we don't have any holes to cut right now, we're trying to think of excuses to buy one of these (Hole Pro)! Thank you to Hole Pro for letting us reprint their article.
Installing recessed can lights or high hats in ceilings has gotten more complicated with all the new sizes of LED, PAR, and CFL light fixtures. Instead of three common hole cutout sizes for the majority of recessed can lights (6-3/8, 6-5/8, 6-7/8 inches, there are now more than 27 common sizes and very few in these traditional diameters.
For example the Halo brand of recessed light cans sold by Amazon, Lowe’s, Home Depot, and others, have manufacturer recommended cutout hole sizes of 3-3/4″, 4-1/4″, 5-1/2″, 6-1/4″, 6-7/16″ for the different size can lights. Another common recessed can light manufacturer is Juno and for their can lights one needs cutout holes of 3-1/4″, 4-3/8″, 5-1/2″ 6-3/4″, 6-7/8″. And this is just for the residential high hats or recessed ceiling lights. Commercial can lights can require cutout holes larger than 8 inches in diameter. So one can spend hundreds of dollars on continuous rim grit hole saws and still not have the right hole saw sizes for the most common can lights. Or for $129 a Hole Pro model X-230 hole cutter can cut any size cutout hole needed from 1-7/8 to 9 inches in diameter.
There are a number of important advantages to using a Hole Pro adjustable hole cutter to make the cutout holes for recessed can lights (or downlights). First is the ability to make the exact size hole needed in whatever ceiling material is to be cut. For thick plaster a slightly larger cutout hole may be needed to provide room for pushing up a remodel style can light into the ceiling space. With soft sheetrock a close fit may be needed with smaller LED can lights like the 3 inch and 4 inch models from Utilitech sold by Lowe’s and the Con-Tech fixtures sold by Home Depot.
Most of the manufactures have stopped publishing the cutout dimensions so one does not the exact hole size needed until the light cans have been purchased and one can measure the template in the box. Often the template is the same for all models from the manufacturer and may be too small for some of the variations, especially with the remodel light cans. With the remodel or retrofit type of recessed ceiling can light the entire fixture has to slip through the opening and often the size of the opening is dictated by the arm that attaches the fixture to the electrical junction box. Some designs, like the Halo in particular, make it much more difficult to insert the can light assembly.
The Halo H5RICAT (“5″ indicates 5″ fixture, “R” indicates remodel/retrofit type and the “I” indicates that it is OK for direct contact with insulation) comes with a template for a 5-1/2 inch size cutout hole. In an actual installation the tape that is wrapped around the light can to help make a good air seal increases the outer diameter of the light can so it requires a 5-5/8″ cutout at a bare minimum and 5-11/16 inches is a safer size to minimize damage to the sheetrock.
The “air tight” ceiling fixtures when installed properly can significantly reduce loss of heated air from living spaces up into the attic. All the air tight fixtures I have examined from the major suppliers are cheaply modified with a thin strip of insulating tape that probably adds 2 cents to the manufacturing cost and does a poor job of providing an air seal. A foam sealant would do a much better job.

The H750RICAT is supposed to fit through a 6-1/4″ cutout hole cut but actually the can light needs a hole at least 6-3/8 inches in diameter for the can portion of the fixture.
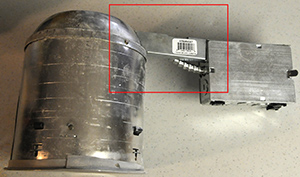
The Halo H750RICAT recessed remodel light can is most easily installed through a 6-1/2 inch opening so that the junction box and can cylinder and the thick arm bracket (outlined in red in the picture) all fit through the opening in the ceiling.
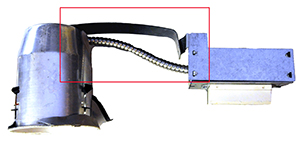
Some of the less expensive remodel type can lights have a thin metal arm that is 1/8″ thick strap steel and which makes them much easier to insert in the ceiling opening. This thin bracket is shown in the picture outlined in red.
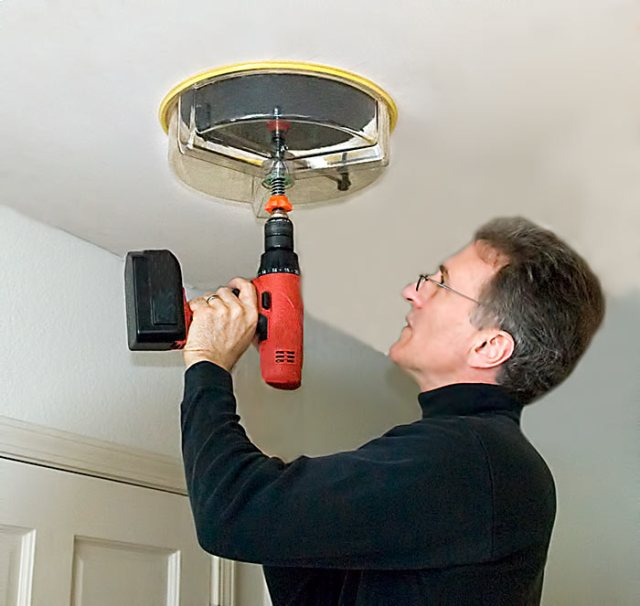
When making the cutout holes for recessed can lights the Hole Pro adjustable hole cutter makes it faster and a lot safer with its adjustable cutting depth control The cutting depth can be set so that the blades only cut the sheetrock or plaster or tongue and groove wood ceiling and nothing more. No worries about accidentally cutting an electrical wire, low voltage audio wire, or plumbing pipe in the ceiling space and turning a small project into an expensive repair job.
The Hole Pro hole cutters also save a lot of time when installing downlights. The hole can be cut faster than a cutout circle can be drawn on the ceiling with the template. It is easy to cut a perfect round hole even with only one hand to hold the drill with the hole cutter when high up on a ladder. The ABS plastic shield is ball bearing mounted so only the hole cutter spins and all the dust and shavings and the cut plug all stay in the shield. Invert the shield over a bucket and everything falls out and the hole cutter is ready for the next hole.
A lot of time is saved when one only needs to place the hole cutter’s pilot drill bit in the center of the spot for the cutout and start to drill. No need to move furniture or lay out a tarp or get out the shop vacuum.
 Sylvania Ultra LED Disc Light is a perfect solution for either recessed lighting or ceiling lighting junction box applications for bringing energy saving LED lighting to virtually any recessed light or light connected to a compatible junction box. See our video below or click here for more details. Discover the benefits of LED and see how simple it is to install the LED Disc Light in both a recessed lighting can or a junction box in your ceiling with our video guide helping you make the transition to LED lighting as easy as possible.
